vxlabs software development handbook
Contents
Welcome to open source vxlabs software development handbook.
It contains a number of best practices for building software, generally web-based, using Python on the backend and TypeScript for the frontend.
However, most of the guidelines are more broadly applicable.
Important note: These are only guidelines. They were never meant to be applied dogmatically. They are great when you are starting fresh, and their intentions are good, but please do understand and adapt to your situation.
- Status: v1.0.2 of this handbook was published on 2021-05-03.
- I’m planning to apply semver for fix and feature (new section) updates to this guide, but will retain the initial publication date for the v1 series.
- Canonical URL: https://vxlabs.com/software-development-handbook/
- Github: https://github.com/cpbotha/vxlabs-software-development-handbook
License
This handbook is copyright 2021 Charl P. Botha cpbotha@vxlabs.com.

I am making
this handbook available under the Creative Commons Attribution
4.0 International License in case you find any part of this useful and
would like to re-use, also commercially. The only requirement is that you give
appropriate credit (author Charl P. Botha cpbotha@vxlabs.com, link back to this site, and so on).
Table of Contents
General
Apply The Joel Test: 12 Steps to Better Code
Joel Spolsky, co-founder of the StackOverflow empire, amongst other great things, published the following 12-point checklist that you can use to evaluate your process and your team:
- Do you use source control?
- Can you make a build in one step?
- Do you make daily builds?
- Do you have a bug database?
- Do you fix bugs before writing new code?
- Do you have an up-to-date schedule?
- Do you have a spec?
- Do programmers have quiet working conditions?
- Do you use the best tools money can buy?
- Do you have testers?
- Do new candidates write code during their interview?
- Do you do hallway usability testing?
A score of 12 is perfect, 11 is tolerable, but 10 or lower and you’ve got serious problems. The truth is that most software organizations are running with a score of 2 or 3, and they need serious help, because companies like Microsoft run at 12 full-time.
These are some of the core characteristics of a great software process.
If you’re able to increase your score by any number, you’re doing good work.
Comment your code
The most obvious mark of good programmers is that they write good code.
What sets great programmers apart from good programmers, is that, in addition to building beautiful and understandable systems, they have a continuous and long-lasting positive effect on the capabilities of those around them.
In other words, a great programmer helps team-mates to level-up.
In this way, great programmers continuously amplify the quality and output of their whole team. In these cases, “10x” is perhaps not even that much of an exaggeration.
One of the best ways that you can help your team-mates, current and future, to be better at their work, is to comment your code.
Put yourself in the shoes of a future team-mate who is most probably going to have to understand your code to add a new feature to the system, or to fix a bug.
The less time they spend understanding your code, the more time they’ll have to do their work well.
Give them as much high-quality context as you can in the comments.
Try to answer questions like:
- Where and how does this module fit into the whole product?
- Why exactly is this implemented in a surprising way?
- How does this non-trivial algorithm work?
- Which otherwise most suitable methods did you not use, and why?
Bonus points if you can add an example of usage to the comments!
This is really not about you believing that your code speaks for itself.
Instead think about your future team-mates who will either be really happy with the guidance you give them, or perhaps a great deal less happy with the extra hours they were forced to spend in order to divine your willfully undocumented intentions.
Be kind. Comment your code.
Have a project README.md that can get new devs up to speed
When new developers join your team, it usually takes a substantial chunk of time to ramp them up.
Consider investing some of that time into ensuring that your README.md has
all of the necessary steps to get a new developer up to speed instead.
Next time this happens, say “welcome!” and point them at the readme!
They’ll be able to help themselves, only coming to you with more specific questions, which you can use to further improve the readme.
In addition to the getting started information, the project README.md should
also contain a brief description of the project, and links to other relevant
documentation, such as the architecture description.
For inspiration, take a look at some of the readmes on the Awesome README curated list.
Maintain a compact project architecture description
Aleksey Kladov, also known as matklad, main developer of the rust-analyzer, makes the case for also maintaining a high-level architecture description at the top-level of your project.
One of the many insightful points he makes is the following:
… the biggest difference between an occasional contributor and a core developer lies in the knowledge about the physical architecture of the project. Roughly, it takes 2x more time to write a patch if you are unfamiliar with the project, but it takes 10x more time to figure out where you should change the code.
followed by:
I find ARCHITECTURE file to be a low-effort high-leverage way to bridge this gap.
The idea is that you create a compact high-level description of the main systems, layers, boundaries, architectural invariants1 and cross-cutting concerns of your project.
Revisit this document once or twice a year to make sure that it still reflects reality.
When new developers start on the project, or future developers have to return to it, this document will be of great assistance. Furthermore, it is also a great opportunity for the current team to review and possibly improve their own architecture at regular intervals.
Give code reviews the same attention that you give coding
Good code reviews contribute greatly to increased code quality, and have many other beneficial effects.
Having someone else check your work helps to catch possible issues, is an opportunity to exchange knowledge and hence to improve (for both the reviewer and the reviewee), and helps to ensure that people stay up to date with other parts of the system.
To get the maximum benefit from code reviews however, one has to treat it as being at least as important as the process of writing code itself.
Developers should understand this, and all forms of leadership should understand this.
The merge request checklist below could be a useful addition to your review procedure.
Apply automated testing generously
In 2021, it has become clear that having a well-designed suite of automated testing that can be executed during development, before features are merged, after features are merged and especially before releases will ensure that your project or product works the way that you intend it to.
This becomes exponentially more important as your code grows, and as your team grows.
Martin Fowler maintains a brilliant online collection of testing resources with much more detail about the different types of tests and practical approaches to testing.
Do take note of the test pyramid: Usually you’ll have a larger number of fast unit tests at the bottom, fewer integration tests in the layer above that, and even fewer end-to-end tests at the top.
This is a balancing act between fast test cycle times for rapid development iteration (i.e. developer running tests continuously as they work) vs. higher confidence that the complete product functions exactly as it should, as can be demonstrated by end-to-end tests.
Be scientific when deciding what to test
Some teams get so caught up in maximizing code coverage, that they end up writing a great number of unit tests in order to do so.
When that product comes into contact with the first user, there is a high probability that it will fail embarrassingly.
The moral of this story is that while it’s good to monitor coverage as one of your testing metrics, it is far more important to measure and study failure models and their impact, and to use these observations to design tests that specifically target expected real-world failures, and to do so according to expected impact.
In other words, designing a few end-to-end tests that prove that your product’s main user flows function exactly as you intended is probably a better time investment than writing a bunch of additional unit tests.
Use automated linting
From the Wikipedia page on the topic:
lint, or a linter, is a static code analysis tool used to flag programming errors, bugs, stylistic errors, and suspicious constructs. The term originates from a Unix utility that examined C language source code.
Many modern languages have great linters available.
Ensure that you have these configured and active for your whole team, ideally directly in the IDE so that programmers get continuous and real-time feedback on the quality of the code that they are writing so that that they can further improve their work.
See flake8 for Python and eslint for TypeScript below for specific examples.
Use automatic code formatting
Back in the day, we used to entertain ourselves with multi-year arguments as to the best placement of the opening brace in C.
Fortunately, many languages now have automatic formatting tools that offer one (and only sometimes more than one) preset.
See for example gofmt, rustfmt, black and prettier.
Using such tools means no more arguments about formatting, and no more manually looking up and applying a coding standard document, so that developers can focus on writing logic that is beautiful.
Ideally these tools are integrated into IDEs, and are automatically applied whenever a file is saved.
They can also be integrated with CI pipelines, as one of the checks before a pull request is merged.
Setup automated CI pipelines with as much code quality checking as possible
These days, most source code management platforms offer powerful mechanisms to setup automated CI (continuous integration) pipelines.
Good software teams use this to run their full automated test suites on their codebases, ensuring that all tests pasts before merging the new code.
In addition to automated testing, teams should use this facility to apply as many additional code quality checking tools to the codebase as possible.
Examples include but are not limited to:
- flake8 for Python linting and style checking.
- mypy for Python type checking.
- eslint for TypeScript linting.
- Clang Static Analyzer or cppcheck for C++ source code analysis
Having these as part of the CI pipeline augments the code review, in that the reviewer does not have to worry about any of the details of formatting and linting as these will be automatically flagged, and can instead focus on more subtle issues.
As mentioned above, most of these tools should also be running continuously and automatically in the team’s IDEs for maximum effect, but having them in the CI pipeline as well helps to ensure that they are applied following project requirements.
Prefer TypeScript over JavaScript
(This sounds like strangely specific advice in the “General” section. However, because so much frontend code is being written today, and because the JavaScript to TypeScript path is now so well-trodden, I have decided to add this here.)
This is what it states on the tin:
TypeScript extends JavaScript by adding types.
By understanding JavaScript, TypeScript saves you time catching errors and providing fixes before you run code.
In 2017, researchers retroactively type-annotated a statistically significant random sampling of github bugs in JavaScript code, and discovered that, conservatively speaking, 15% of those bugs would not have been made in the first place had a type system such as either Flow (type annotation) or TypeScript been used.
That’s a pretty solid scientific finding indicating some of the practical benefits of type systems.
From my practical experience, after years of as-modern-as-possible JavaScript and initially resisting the perceived extra burden of using TypeScript, TypeScript improves the quality of our products by:
- Augmenting our code documentation with rich and structured information about the exact nature of data going in and out of functions.
- Enabling IDE tooling to give much better interactive assistance as we work. In other words, the IDE is able to surface and apply the typing-information that has been specified previously.
- Enabling tooling, both IDE and off-line checks, to catch typing and other errors in their tracks.
The general arguments for commenting your code up above also hold for using TypeScript instead of JavaScript. By doing this, you can help your team-mates, current and future, to be better. (You’ll probably also be helping future you at some point.)
As if that’s not enough, here’s some social proof:
In the 2020 Stack Overflow developer survey, TypeScript had moved all the way up to the second position, right below Rust, on the list of most loved languages.
Gradual conversion
On a practical note, it is straight-forward to setup your frontend build configuration to mix JavaScript and TypeScript files. In other words, you can configure that, and then start writing all new code in TypeScript, whilst converting old files when you can make the time, all the while keeping your existing app building without issues.
In other words, it is practical, and recommended, to gradually convert your JavaScript codebase to TypeScript.
Choose boring technology
This guideline is also known as “beware the shiny”.
We developers love shiny new technology.
In some cases, one can justify pulling some shiny into a project.
However, most of the time, you are going to save yourself and your team much time and sleep by choosing boring technology.
If you choose the most well-known and time-proven technology, chances are that many of the issues you would otherwise have run into, have already been encountered, solved, and documented.
One example of applying this guideline, is defaulting to Django when you need to write a backend in Python.
Please try to make time to read the “Choose boring technology” essay by Dan McKinley. It originally brought this piece of wisdom to a much broader audience.
Version control (with git)
Follow the 7 rules of writing good commit messages
See this blog post by Chris Beams with the motivation and background of these rules.
I repeat the rules below for your convenience:
- Separate subject from body with a blank line
- Limit the subject line to 50 characters
- Capitalize the subject line
- Do not end the subject line with a period
- Use the imperative mood in the subject line
- Wrap the body at 72 characters
- Use the body to explain what and why vs. how
The post by Beams contains a great example of a rather extensive git commit message that I reproduce below, also for your convenience.
Commit messages generally stop at the first line, but that means many people somehow manage to break the first five of the seven rules, so at least pay careful attention to the example’s first line.
|
|
Commit atomic changes and describe each one carefully
Try to apply the same discipline and passion that you to do coding, to the crafting of commits and commit messages.
The ideal outcome is that each feature branch consists of a number of well-described, single-intention, or atomic, changes.
A good test for single-intention is whether you can describe that single change in 50 characters or less, which is totally coincidentally the maximum length for the git commit message subject.
Doing it like this is desirable for the following reasons:
- The git history will be a step-by-step description, that can be read almost like a story, of how a feature was built. Imagine future you, or a future team-mate, reading this story to try and understand your work. A sequence of well-described, single-intention commits gives a much better representation of history than a single composite message.
- If a bug is introduced at some point in history, it can later be found more easily with techniques like git bisect.
- If anyone needs to forward or backward port changes to a release branch, or back to the develop branch, as is described by gitflow, the relevant commits can be easily cherry-picked, because they are single-intention, and compactly described.
We know that some folks have taken to squashing all feature branch commits into one combined commit, in order to work around badly formulated commit messages.
Why would you do that?
Rather address the root cause of the issue, and help your fellow developers to learn how to formulate atomic commits, and to write great history.
If you squash commits together like that, you lose out on the benefits listed above. More broadly speaking, you are deliberately losing valuable historic information for no defensible benefit.
However, even the most disciplined developer might have written a commit message titled “wip” or “moving to laptop”. In these specific cases, it is justified to apply squashing only to absorb such commits into a neighbouring atomic commit.
Remember that software development is not only about coding.
Its other components, such as writing documentation, writing automated tests, reviewing code and, as described here, recording history, deserve the same discipline and passion afforded to its main event.
Rebase feature branches before review and before merging
Rebasing before review and again before merging, with a merge commit, results in a more linear git history where each feature branch is clearly separated from the feature branches before and after it.
When this rebasing approach is combined with writing good commit messages, your git history becomes a much more usable linear and hierarchical record of which changes happened when, both at the commit level, and at the feature level.
Below an example is shown from a real project employing gitflow and the rebase-before-merge guideline.

Figure 1: Linear hierarchical history thanks to rebasing before merging. Merge commits in each case contain more information about the feature and metadata like the PR reviewers.
Note that:
- each discrete feature occupies its own horizontal section with no overlaps. This is only topological however, the commit dates remain entirely correct.
- each feature branch is ended by a merge commit which contains more information about that feature.
In exceptional cases, it can happen (but it shouldn’t) that a feature branch
has grown so complex to make a rebase prohibitively difficult. In these cases,
after this has been discussed with the team lead, one could consider merging
develop into the feature branch instead of rebasing. However, this should be
considered a last exit.
Use gitflow for versioned software releases
The original gitflow branching model was published by Vincent Driessen on his blog.
Please go read the whole post as soon as you can make some time.
Until then, refer to one of Driessen’s great diagrams below, and follow these updated and highly paraphrased instructions:
- Your git repo has at least two major branches:
developandmain. - Every new feature, bug fix or task is developed in a feature branch, branched
from
develop. - (After the pull request and review process,) that feature branch will be merged
back into develop.
- We add here the extra requirement that the feature branch is rebased from master before review, and again before merging, see rebase-before-merging above.
- When you are preparing for a release, create a new branch of
developand work on that until ready for release.- Tag the specific commit that makes it into release.
- After release, and hopefully fame and fortune, merge the
release-branch in question back intodevelop, and also, quite importantly intomain.- In other words,
mainis always production-ready code.
- In other words,
- If you ever need to make an urgent hotfix to a production release, branch
from production-ready
mainand prepare hotfix release.- Once the hotfix release is done, merge back into
mainand intodevelop.
- Once the hotfix release is done, merge back into
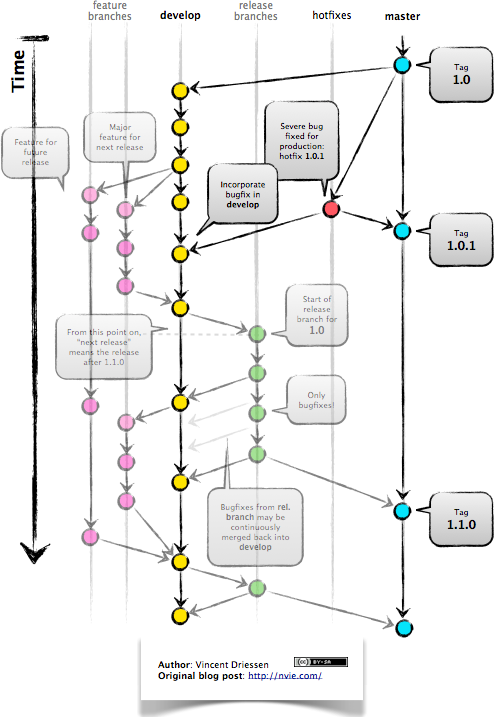
Figure 2: The gitflow model, including develop, master (now main), release branches and hotfixes.
Please do take note of Driessen’s update of March 5, 2020, where he recommends that gitflow should not be treated as dogma.
It’s a guideline that is to be adapted for your situation.
Use GitHub flow for continuous delivery
If your team does continuous delivery, i.e. not fully versioned software releases, consider a simpler model than gitflow, for example GitHub flow.
My experience is mostly with versioned software releases and gitflow, so I’m keeping this section short.
Before merging, apply the merge request checklist
From the following Tweet by pablosaraiva:
- Changes a single thing;
— pablosaraiva (@pablosaraiva) January 16, 2021
- Has a good tittle;
- Has a link to the ticket;
- Was pair reviewed;
- Build and tests pass;
- Static code analysis pass (sonarqube);
- Code changes are simple to understand;
- Things that need documentation are documented;
- Code has test coverage.
Following is a fixed and grouped version of the checklist.
Before a merge request can be merged, the following has to be checked:
The request:
- Changes a single thing;
- Has a good title;
- Has a link to the ticket;
- Was peer reviewed;
In addition:
- Build and tests pass;
- Static code analysis pass;
- Code changes are simple to understand;
- Things that need documentation are documented;
- Code has test coverage.
Think about your diffs: Use git mv to move or rename
When you want to move a file to a different directory, or maybe even just to
rename it, please use git mv.
Git will correctly note the move / rename, and carefully diff any changes that you might have made to the content.
It sometimes happens that some tools (or some humans) remove a file and then re-add it in its new location, so that git dutifully records a full content deletion, and then a full content re-addition.
Looking at the git logs, it now becomes unnecessarily difficult to determine whether the file was simply moved, or whether there really was a substantial change of contents.
Usability
Read and absorb Steve Krug’s “Don’t make me think”
This book is a great introduction to website (and to a large extent general UI) usability that gives insight into the mind of that very mysterious being, namely “the user”.
Until you can make time to read that book, I will try and summarise the gist of it here.
Krug’s first law (and chapter) of usability is: Don’t make me think!
He makes the incredibly important point that users are never going to spend us much time and effort trying to figure out the web-pages (and the UIs) that we design as we would like to think.
In fact, we have little more than a glance to work with.
If the web-page or UI is not usable enough within that moment, we are going to lose the user.
Therefore, a web page, or any UI, should as far as possible be obvious and self-evident. If that’s really not possible, it should at the very least be self-explanatory.
Optimize for the default
This is a guideline that I picked up from a professor of information visualization in the Netherlands in the early 2000s, and that has served me well ever since.
In that context, the guideline was for designing interaction flows in often complex information visualization tools.
There are often multiple ways for users to navigate through and interact with the system.
In such cases, try and find the flow that will be used 90% of the time, and make that specific flow work as smoothly and as effortlessly as possible. After this is done, continue to the second most often used flow.
It does seem pretty obvious when you realise that this will mathematically benefit the greatest number of users the most.
That being said, this guideline is quite useful to help disentangle complex user interaction requirements, as one can first tease out the “default flows”, and go from there.
Here I mention it in the context of usability, but the principle could be applied in more contexts. Find the default mode of operation of any system, and start by optimising those.
Pick and use a design system and accompanying toolkit
The environments I mostly operate in are dominated by back-end expertise and engineering. In other words, we mostly only have occasional access to UI experts and frontend folks.
In environments such as these, and probably in many others, a practical and useful piece of advice is to select one of the high quality design systems that are available, as well as an accompanying re-usable UI component library, to apply these consistently in all of your projects.
We generally use Material Design along with material-ui for our React frontends.
Python
Type annotate all the things
The same three arguments as for Prefer TypeScript up above hold for Python type annotation. The findings of the JavaScript-based type annotation study mentioned there are most probably also relevant.
In short, type annotation in Python is structured, human- and machine-understandable type information that enriches your documentation, can be used by IDEs to assist you and your team-mates in writing code, and can be used by IDEs and offline tools such as mypy to help catch bugs before they happen.
During the Python Language Summit 2020, Guido van Rossum remarked that since 2014, when Python type annotations were introduced, ten type-checking PEPs have been approved.
Please also see the type system study cited under prefer typescript over javascript.
At the time of this writing, it seems that the Python ecosystem is reaching or perhaps has reached some sort of tipping point in terms of type annotation.
For example, here is a May 8, 2021 tweet by David Lord reporting how he spent about two weeks type annotating several important libraries, inucludng Flask, Jinja and more:
Due to the complexity of the libraries, I added type annotations to Flask, Jinja, Click, Werkzeug, MarkupSafe, and ItsDangerous by hand. In total: probably 2 weeks straight of work, +9607/-6494 changes. Hit so many corner cases with typing, mypy, and our code, but it's done.
— David Lord (@davidism) May 8, 2021
If you need some more data points to help convince folks of the added value of
type annotation, see this recent case study by the urllib3 developers. Here’s a
good quote to start with:
When we originally started this journey our primary goal was to provide a good experience for users who wanted to use type checking tools with urllib3. We weren’t expecting to find and fix many defects.
After all, urllib3 has over 1800 test cases, 100% test line coverage, and is likely some of the most pervasive third-party Python code in the solar system.
Despite all of the above, the inclusion of type checking to our CI has yielded many improvements to our code that likely wouldn’t have been discovered otherwise. For this reason we recommend projects evaluate adding type hints and strict type checking to their development workflow instead of relying on testing alone.
The numpydoc convention for docstrings is a good choice
The numpydoc convention for docstrings is a low-friction, more natural way of documenting Python code that we strongly recommend if you have nothing else in place.
It’s easy to write, reads well in its source form, and still renders beautifully structured code documentation.
The latest guide is available online. An example of source and rendered ouput can also be viewed.
Prefer poetry for managing project and product dependencies
From the Poetry documentation:
Poetry is a tool for dependency management and packaging in Python. It allows you to declare the libraries your project depends on and it will manage (install/update) them for you.
Poetry solves two really important problems for us:
- It enables the flexible specification of dependencies, but through its package locking mechanism, offers a straight-forward and reliable method to reproduce exactly the versions of dependencies on other systems. This is crucially important when we want to develop, test (especially in CI) and deploy on systems that are the same down to the package hashes.
- It enables the flexible definition of package metadata, so that we can build and distribute our own packages to act as dependencies for third party packages.
There are and have been other tools that attempt to solve the same problems, but so far none as effectively as poetry in practice.
Consider Conda for managing data-science and R&D dependencies
The Conda ecosystem has great support for data-science and especially machine learning R&D workloads.
In some of these cases, you, or the data-scientists you work with, might strongly prefer having access to Conda packages.
If you have evaluated the pros and cons in your situation, you may decide to go with conda.
We recommend miniforge, and specifically the mambaforge variant on that page, a drop-in replacement for conda that defaults to the conda-forge, supports various architectures, and also optionally supports PyPy.
The main reason we recommend this, is because your organization may or may not have a license to use the main Anaconda repository.
Conda itself does not support version locking like Poetry, but you can make use of tools like conda-pack to bundle your application with its environment.
Use the black formatter with defaults
The black formatter documentation makes good arguments for line length 88, including that it’s more than 80 (can’t argue with that), but perhaps most importantly that longer line lengths could be problematic for folks with sight difficulties.
Furthermore, sticking to the formatter default means one fewer setting that has to be modified.
Use flake8 to check your Python as you work
Configure your IDE to apply flake8 checks continuously as you work.
We prefer the google import style (grouped from built-in to third-party, sorted within groups), and numpy docstrings.
The following .flake8, to be installed in the root directory of your
project, takes care of what’s mentioned here.
|
|
Use cell-based debug scripts
Visual Studio Code, PyCharm Professional and a selection of other IDEs and editors support Python scripts with Jupyter-like code cells.
Code cells are blocks of code that start with #%% comment describing this cell, in an otherwise normal Python script.
Blocks can be interactively executed one-by-one, often with additional UI tools to inspect variables and even charts, a feature that facilitates experimentation and debugging.
In addition to test files following the naming convention test_*.py, we
suggest here to add code cell scripts, following the naming convention
debug_*.py, to your project.
These scripts can be used to demonstrate or document aspects of the project, or they can be used to explore APIs in use by the project, in both cases helpful to (future) team-mates.
If you follow this convention, debug_*.py scripts can be easily excluded from
automated linting tools.
Prefer Django
Django is the highest quality Python web-framework.
It comes with almost all batteries included, it is exhaustively tested and it is well-documented.
Importantly, it is quite opinionated, meaning that you don’t have to waste time deciding on alternative solutions for aspects of your back-end. The solutions are already all there, and they’ve been battle-tested. However, many of these components can be swapped out if you really want to.
Put differently, Django’s structure and good conventions mean that your team is working consistently over the whole project, and also across projects.
These points are nicely summarised in this HN comment by Nextgrid.
The Django ORM by itself is worth the price of admission.
In addition to all of that, the large and active community means that:
- The strange behaviour you’re seeing in your app has already been explored, documented and fixed by someone else. Just search.
- There are multiple libraries and configurations for any possible requirement you might have.
Sometimes people operate on the assumption that Django is somehow too large for a small service, and then choose some other smaller-appearing framework.
Why would you do this?
If you use a subset of Django’s functionality, it becomes a smaller framework in memory and in complexity.
However, in future you have the option of switching on any of the built-in functionality when the project requirements change.
Longer-running projects and product development trajectories are especially vulnerable, because it can be hard to predict how requirements can evolve over time. With Django, there is a high probability that it has your future bases covered as well.
To summarize: Choose Django, unless you have really good and really specific reasons not to do so.
For more fantastic guidelines on how to use Django to write software that will give your startup / business the maximum number of chances at success, please read Alex Krupp’s Django for Startup Founders: A better software architecture for SaaS startups and consumer apps.
What about FastAPI?
We have used FastAPI in the past for a machine learning project that required asynchronous operation (for pushing results via websockets to the interactive web frontend) but did not require a database component or any user authentication.
Although our experience with this impressive piece of software was great, our Django products have seen many more users and many more years of stable operation.
Furthermore, since then Django 3.1 has gained many more async capabilities. Faced with the same requirements today, we might choose differently.
Again, choose Django, unless you have really good and really specific reasons not to do so.
TypeScript
Use eslint and configure your IDE to apply it continuously
eslint is currently the best linter for your TypeScript.
As suggested in the general guideline above, everyone on your team should have eslint configured and running continuously as they work on TypeScript code.
You could start with some recommended rules for typescript by setting up you
.eslintrc like this:
|
|
Make sure that you have eslint and all relevant plugins installed.
- This TypeScript 4, ESLint & Prettier Project Template shows how to extend the above with prettier formatter support, which we recommend below.
- If you’re also using React, combine the above with the example from this post.
Visual Studio Code
Install the dbaeumer.vscode-eslint extension for continuous application of
eslint to your code.
What about tslint?
After some time using the purpose-built tslint for our TypeScript codebases, I was surprised to discover that tslint was being sunsetted, and that significant effort had been put into upgrading eslint to replace tslint as the premier TypeScript linter.
In fact, the TypeScript team themselves had switched to using eslint on the main TypeScript repo.
Group your imports
We take our inspiration from the Python PEP8 recommendation:
Imports should be grouped in the following order:
- Standard library imports.
- Related third party imports.
- Local application/library specific imports.
… and we formulate this rule for TypeScript as:
Sort TypeScript / JavaScript import groups from standard to local. In other words, sort the groups from base through to custom, or in more other words from far to near.
For example, in a React component based on material-ui, this could look like:
|
|
We do this for at least two good reasons:
- This adds a light-weight hierarchical structure to the imports, which facilitates the understanding of the dependency network between all of the modules in your project.
- As is almost always the case, having conventions such as these frees up a few more mental cycles when writing code.
You can implement this in eslint as follows:
|
|
Use the prettier formatter
Using an opinionated and automatic code formatter like prettier saves you time, because you don’t have to think about formatting anymore, and perhaps more importantly, you don’t have to debate about it with anyone.
prettier recommends against any other printWidth than 80, because their
algorithm does not treat it as a maximum length, but rather as a desired
length.
Due to this limitation, and because TypeScript is different from Python, here we recommend going with prettier’s defaults.
Configure your IDE or editor to run prettier automatically on save:
Visual Studio Code
Install the “Prettier - Code formatter” extension (extension id:
esbenp.prettier-vscode).
Activate editor.formatOnSave.
React
In this section, I list guidelines to remedy issues I see very often in React and Redux projects.
In addition to these guidelines, try to make time to review:
Use ducks to organize your Redux
For each feature in your frontend, it makes a great deal of sense to bundle together action types, actions and reducers in a single file.
This is called the ducks pattern, and it is “strongly recommended” by the Redux style guide.
Don’t deep copy state
One of the first things we learn in Redux, is that it is critical not to mutate state.
What some developers then soon resort to doing, is to deep copy (some) state in reducers in order to ensure that nothing is mutated.
This is a common misconception that will cause performance issues in most apps, related both to unnecessary memory copies and to unnecesary redraws, and should obviously be avoided.
In reality, for a non-nested state, a shallow copy and update are sufficient. For nested state, one has to shallow copy and appropriately update each level in the state.
The rule is: You want to do the absolute minimum for any dependent components to see a change when they do an equality check, but without changing any existing fields or nesting layers.
For example, if a reducer only needs to change two top-level properties, namely
label and answer, the below is sufficient:
|
|
This means that everything except the two properties are shallow copied, so the rest of the data members are the same objects, but wrapped in a new state object.
Please see the Redux documentation on the matter of state updates for examples showing how to handle deeply nested state.
Use named functions for effect hooks
I often see React projects with effects like useEffect(() => {/* a fuction body */})
Arrow functions are certainly popular, but in this case, there is an opportunity to name the effect function for increased clarity.
Following this convention will encourage developers to think carefully about the purpose of the effect in order to name the function well, which will in turn help team mates down the line to understand the role of each effect.
In the React Rules of Hooks examples, there are examples of named effect functions that look like this:
|
|
As an added advantage, these named functions will also show up in your IDE’s code navigation UI.